Saturday, June 25, 2011

Dad's R1

Here are some pictures of my Dad's R1, he has been racing the wheels off this bike this summer at his local track. He recently added a longer swing arm and a launch rev limiter, soon he will have every possible gadget that can fit on this bike but I am sure he will come up with a few more. To date his quickest times is a 10.550 and fastest speed is 132.40 MPH in the 1/4 mile.


Friday, September 10, 2010

Testing

I thought I would post up some pictures from testing. Still have tweaking to do with the set up, but it is picking up ET each pass so I think we are heading in the right direction.


Sunday, August 15, 2010

The IR 'Fix'

Sometimes when you use non-standard methods and parts, things do not always go as planned. Such is the case with the IR manifold casting. After a great deal of effort to get this old mechanical injection unit updated to electronic injection, and then starting the car, it was clear that something just was not right. After analyzing, investigation, over analyzing, and then analyzing some more, we developed the following conclusions:

1.) The angle of the intake to head flanges were incorrect by about 1-1.5 degrees, resulting in about a .020 gap at the flange when after the manifold was tightened down and creating leaks.
2.) The manifold was probably made for a raised runner head, so the alignment of the ports was way off, in principal it looked like the manifold was sitting to high in the heads
3.) There was to much clearance in the throttle shafts causing leaking and problems with consistent idling between cylinders.

So here is the fix:

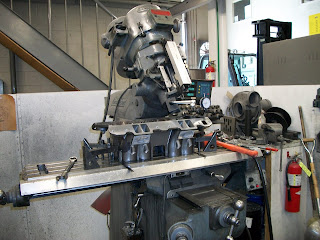
1/2.) Aaron used the Bridgeport Mill to machine the correct angle and remove enough material to drop the manifold deeper into the V of the engine. This required the mounting holes in the manifold to be slotted to allow the bolts to go through the intake holes into the head. Custom intake gaskets were made to get a good seal between the manifold and head.

3.)The throttle shaft bores were bored oversize on the horizontal boring mill, and bushings were inserted, and reamed to fit for the shaft. Due to the length of the shaft, it was split and a coupler machined to provide flow adjustment between the front and rear cylinders.

Seems that the fix was successful, no leaks and I was able to synchronize the flow on each cylinder. Special thanks to Aaron and Dad for all the effort in fixing up the manifold!


Tuesday, June 29, 2010

"Use it up, wear it out, make it do, or do without!!"

These are the words that my dad used to say to me when I was a kid and I wanted something 'new' my guess is that they were probably told to him at some point in time. I was in a position to where I needed to buy a new trailer, or make some upgrades to the one I have. I took this as a chance to make it do and save a little $$
The upgrades:

  • Replace the manual tounge jack with an electric jack
  • Remove the vinyl flooring and coat (never do this, trust me)
  • Install electric winch for loading
  • Generator shed was empty, but now occupied
  • New ramp
  • Paint portions of the interior (+ tons of cleaning)
  • Refinish wheels
  • Diamond plate on the floor where the tires sit
Here are some after pics.


Friday, December 11, 2009

The Undercover

Well, it has been a long hard road, but here it is......... the Undercover chassis, rear engine, swing arm dragster. It has not been without its challenges, some of you understand what it takes to get something like this off center with limited resources. I have to say that going into this, I had no idea what I was doing, how it would turn out, or what i was getting myself into. This car has a old IR mechanical injection system that I converted to EFI, (see the previous post) which required some out of the box thinking, and many custom designed and machined/fabricated parts to implement the system into this application.

(Click on photos to enlarge, see previous thread for engine details)


(Stainless headers)


(Weld Alumastars, 2 piece)


(Designed the coil mount in CAD, cut on laser)


(4 Link with single shock)


(8.90 on the dial in, S/C standard)

(Delay box on left, AFR gauge on right)


Wednesday, October 14, 2009

SBC IR/EFI project

After selling the Racetech, i knew i would buy another dragster, and wanted to move from the slip joint car to a full suspension car. I also wanted to have something 'different' for a power plant rather than the carb or mechanical injected engine that every dragster has. After a little bit of research and looking at the options, Flathead Shaun found an old Individual Runner (IR) mechanical injected intake manifold. I knew I would also be moving to an electronic fuel injection (EFI) system, not very common in bracket dragsters, so i would be retrofitting the manifold to work with the EFI.

I designed the injection system in Solidworks. It allowed me to be able to have drawings for all of the parts that needed machined and lazer cut. It took me a great deal of time to get everything just right, it is more difficult than if looks. Things can get pretty tight when trying to implement all the EFI components, as well as a scoop. I always try to make each component have more than one purpose as seen in the block in the center of the manifold that contains the TPS and a small manifold block to draw a vacuum signal (the IR intake basically turns the engine into 8 individual cylinders)


(This is the manifold I started with, an old mechanical injection, I do not even know who made this unit for sure.)

In the conversion, I also needed an EFI controller. These can be a very expensive part of the conversion and a reason that people do not make the switch , so i put one together myself with a processor and board from group of enthusiasts that developed what is called a Megasquirt II . The great part about this is it is very versatile, and inexpensive as you build and configure it yourself as long as you are willing to put the time in and learn a few things. It was basically developed by a bunch of car guys that had a lot of programming, and IC engine knowledge and had some time on there hands. As such, all the software (tuning and data logging) is very inexpensive. The extra box on top is for the Low impedance injector drivers. I am running 120lb/hr low Z injectors on methanol (4A peak.1A hold) on a belt drive pump.


(processor etc on left, Low Z boards on right)


(I had to create a schematic for future troubleshooting)

(Data logging during tuning)

I purchased a long block from a guy in Michigan. It has a Dart Little M block, Brodix Track1 heads, Scat Crank, Oliver Rods, Wiesco pistons, 14.5:1 compression, Jesel shaft rockers/timing belt system, and a roller cam. Mounted to the front of the engine is a Moroso vacuum pump, CSR water pump, Aeromotive belt drive fuel pump, MSD crank trigger, and a Shogun alternator. I am running it on alcohol (methanol), and given the setup with the injection i am hoping that it will produce some good torque for a good ET. This engine produced 700 HP on the dyno with an alcohol carb.


(On the stand with the carb intake still on)

(Jesel shaft rockers)

(The throttle plates must be set after manifold is torqued, before the stacks go on)

(Fuel rails and headers installed)

(Way to many things mounted to the front of this engine!)
(Fuel shut off mounted off t-stat housing)

(FP regulator and return)

(ECU mounted)


(stacks installed)


(Note the TPS/MAP manifold in the center)

(scoop tray)

(AIT sensor in mounted in the center)

(Regulator through scoop tray)